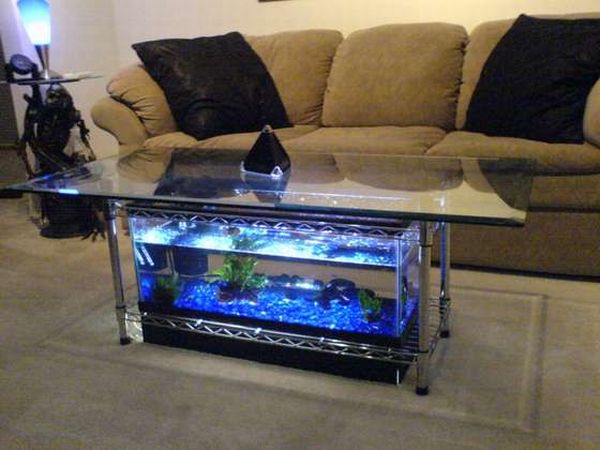

A coffee table that has a glass top and an aquarium that is placed in the center is called as an aquarium coffee table. A ready-made aquarium coffee table’s price starts from $500. This coffee table saves space by merging the coffee table with the fish tank. You can make your aquarium coffee table for a cost which is half when compared to the already made models. Read on to know how to build your own aquarium coffee table.
Difficulty level: Moderately challenging. It may require expertise in a few areas.
Time required: Depends upon the skill of the performer.
Resources required:
1. 20 gallon long tank
2. Two 24 inch fluorescent fixtures
3. Power strip
4. Black foam board
5. Light timer
6. Two 1 inch chair end caps (4 pack)
7. 36 inch x 14 inch wire shelving unit
8. 20G internal filter
9. Glass table top
10. Glass vase marbles and beads
11. 100W heater
12. 2 prong, 3 way power splitter
13. Mallet
14. Zip ties
15. Bolt cutter
Estimate cost: The cost for this project depends upon the availability of the resources. It would be somewhere around $200 to $300
Instructions
Step 1: Assemble bottom part of wire shelving unit
The wire shelving unit comprises four posts usually split in half while packing. Some 36 inch x14 inch shelving units come with posts that are split into irregular lengths with the top segment around 18 inches tall. This one would be the best option as a short segment provides proper legs for the table. If you are not able to get such shelves make use of a hacksaw. Affix the first shelf at a suitable height that will let you to stow the power strip as well as light fixtures below it.
Step 2: Zip-tie power strip and fluorescent fixtures
Look where you have to route the cable through prior to securing them with zip-ties in place. In case you are using two light fixtures then make use of the power splitter along with the light timer. Make arrangement as such that it leaves enough space for clearance so that you can unplug the timer and remove it to change the time settings when required, at the same time you can plug and unplug the filter and heater of the aquarium.
Step 3: Add aquarium
Now, put in the aquarium and check whether the heights and clearances are as per your likings or not. Ensure that you keep adequate space over the edge of the aquarium so that you can drop in food without having to remove the glass top. Well, this depends on your choice.
Step 4: Cutting the shelving wires from the top shelf
Including an additional shelf will add to the steadiness and looks of your coffee table. Make use of bolt cutters to take out the interior shelf area to make you top or middle stabilizing shelf. Once you have placed that shelf complete the support structure by inserting rubber chair end caps on these posts.
Step 5: Add the aquarium components and decor
As you have completed the above steps, now start testing the situation of lights and power. Place the table accurately where you want it to be as it would be difficult to move the table after after adding water.
Place an internal power filter in the corner of the tank. It is an unobtrusive but a functional way to give filtration. Similarly, you will need an average submersible heater if you are keeping fish that require a temperature other than normal temperature. Route the cables in a corner of the tank then through the bottom shelf and later on to the power strip. Zip tie in position as required. Use a suction cup and glass tube thermometer and mount it diagonally in the internal side of the aquarium. This would help you read it while sitting alongside the table. Now decorate the tank by placing colored, flattened glass marbles in a thin layer.
As this aquarium has no top you can also place species that can jump. But, make sure that you are not filling the tank till the top.
Step 6: Fill and add top glass
Cut out the foam board into suitable strips and fix them vertically beneath the bottom shelf so that it conceals the components as well as offers extra light. Now, add the suitable quantity of water and fish to the aquarium. Then, cover the aquarium with a thick glass, which is bit longer than the aquarium. The glass needs to be longer so that you can easily pick it up in future. Now your new coffee table is ready!
Frequently asked questions
Q. I have an already used filter and thermometer from my old tank. So how do I place it?
A. If you have a used system, simply hang the filter and thermometer into the tank. Hang it to one side of the aquarium.
Q. Do I have to heat the water before adding fishes/how do I know the exact temperate required?
A. After you fill the tank with water, let it heat up to normal temperature. Later on add the fish. If you want to know the correct water temperature, consult your local fish or pet store.
Quick tips
1. Before placing any fish, it’s recommended to do some study regarding the preferred species of fishes that you want to keep.
2. After you have placed the internal power filter and heater and zipped the cables in place, properly connect it to the power strip. But, it is recommended not to power these devices till they are under water. There is no need to plug them till you have added water.
3. Go for an acrylic or glass inset for the top of the tank. Place the glass top as such that you are leaving some space to allow airflow.
Things to watch out for
Be careful while using a dremel or file on the remaining stubs. Cut out all the wires and sharp edges from the upper shelf to make it safer in case to avoid any child getting hurt by putting hands inside.