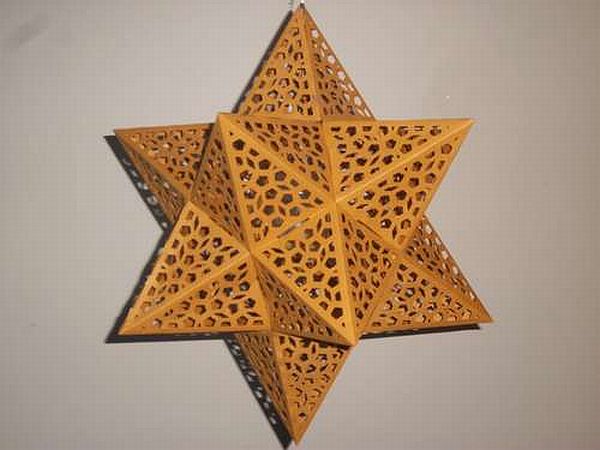

DIY projects are fun and the perfect excuse for spending an enriching and quality time of fun and excitement with your family and kids. For some, DIY projects are a craze and the best way to rewind after a stressful week at work. Are you are DIY enthusiast? Checkout this beautiful 3 dimensional star, fondly named as Quasicrystal Star Lantern by its creator. This project is also a tribute to the chemist Dan Shechman who was awarded the Nobel Prize for his discovery of certain crystals that show a periodic geometric tilling.
Difficulty Level: Moderate
Time Required: 1-2 hours
Resources Required:
Laser cutter or any home cutting device
Letter sized linen card stock, Mylar, wood venner, HDPE sheet or any other flexible material- 12-15 sheets
Baby food jar or a tea light candle holder-1
Tea light candles
Small metal or glass bead which as a hole for fitting through the wire
Hardware – 3-4 feet
Estimated cost: N/A
Instructions:
1. Use the laser cutter for cutting panels and patterns on the card stock. Check your device for the right cutting software where dashed or dotted lines can be made on the card from where the pieces can be easily pushed out.
2. The laser cutter can be set to do 2 passes on the cut line so that the pieces are easy to remove without spoiling the edges. If this is not possible, you can run your machine a second time if it passes through the exact positions where it punched before.
3. Cut 12 panels like this and detach the pieces from the holes carefully. You can pull them out through the back of the card stock so that even if the paper gets damaged, it will be concealed in the back of the star.
4. Most of the small pieces will come out just by flicking the sheets. Keep the punched paper aside once you have removed the pieces from all the 12 sheets.
5. Now, every panel that is cut will form a 5 faced pyramid when you fold along the dotted lines created by the laser cutter. Create mountain folds except in the place where the bullet shaped tab joins the panel, where it will be a valley fold.
6. Mountain folds fold towards the person while the person faces the front of the page and the valley fold is just the opposite where the fold is moving away from the person and the paper comes towards him.
7. You can start the folding by first folding the tab which is around the edge of the panel and finally the long edges can be folded which will come over the panel.
8. The projected tabs can now be inserted along the panel’s long edge. Start with the tab at the pointed tip and push them securely into place as you move down and secure the next three tabs. Until the base of the pyramid is complete.
9. If the slots have not been cut properly, the tabs may have difficulty fitting into the slot. In such cases, you can remove the tab and gently press the tip of a paper cutter and apply gentle pressure at the edge. This will open up the slot a little bit, helping the tab to fit well.
10. Continue folding all the panels in this manner until you have successfully carved out 12 pyramids that are free standing.
11. Now, coming to the glass jar that has to be hung inside the lamp for the candle, take the hardware wire and measure it so that it will fit around the opening of the jar with an inch extra on each side.
12. Mark the middle of the wire and pinch the tip and twist in into a loop. Open up the loop wide to form a hole, which will act as the handle for hanging the jar.
13. The wire can now be wrapped around the opening of the lid and twisted to keep it securely around the jar.
14. Test if the jar hangs perfectly in balance after the loop and the wire is created. Make the necessary adjustments to keep it steady as possible when you hang.
15. Now cut off a piece of wire for hanging the glass jar into the star. The wire can be looped through the handle loop that we created for the glass jar. Make sure that the arch of the handle is not too deep. One inch height between the jar opening and the handle is sufficient.
16. Twist the wire securely on the handle loop of the glass jar. Now, the tip of the wire will go into the point of the star and come out through the other side.
17. Before this, you must place the stopper object on the wire and place a knot at the base so that the stopper prevents the star from sliding down.
18. Take the tip of the wire up through the tip of the pyramid and make a loop on the outside for hanging the star. The wire must be adjusted in such a way that the opening of the jar is about 3 inches from the pyramid base.
19. Now take the lantern filled pyramids and connect the edges of the pyramid to other pyramids to form 5 petalled flower design. The tabs have to be inserted one at a time and the point of the pyramid adjusted to make the next tab point towards the hole before proceeding.
20. Take another pyramid and make another 5 petalled flower pattern which will be the lower part of the star. Now it is easier to fix the two sides together to form the star. Leave one side open for the lantern.
21. Now light a tea light and drop it into the glass jar to enjoy the stellar vision!
Frequently Asked Questions:
1. Can the star be made without a laser cutter?
Ans. Yes, but it could be challenging to cut out the holes and tags and fix the edges.
2. What other materials can be used for making the star?
Ans. Any flexible material can be used for the purpose, as long as it’s sturdy and holds the shape.
Quick Tips:
1. You can position the star in such a way that the opening is against the wall, concealed from the front or choose to close the opening in such a way that it is easy to open and close for replacing the tea light
2. Use a decorative hardware wire to enhance the overall impact.
3. Add glitters or sequins to create a sparkly atmosphere.
Things to watch out for:
1. Make sure that the glass jar opening does not slant towards the star panels or is too near the pyramids to avoid fire hazard.
2. It’s better to leave one face of the pyramid open for easy replacing of tea lights.