 Introduction
Concealing curtain fixtures is quite uncomplicated. While the purpose of preventing convection currents is being served, you can also choose a design that suits your taste.
With a few simple actions, it is easy to improve the thermal performance of pelmets. Heavy curtains with pelmets can reduce the loss of winter heat through the window by up to 37 per cent.
Pelmets can be fitted to windows of any shape and the design can easily be adapted to suit different windows and styles. The types of designs and materials used are endless. Depending on the design chosen, a pelmet could save you a ton of money.
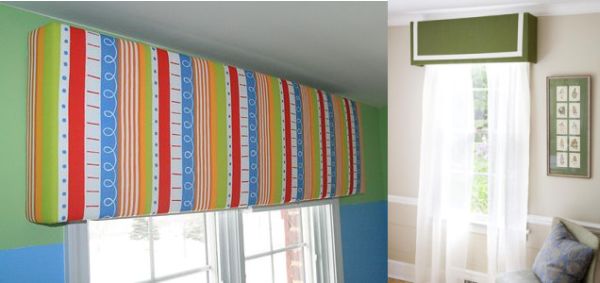
Stiff pelmets add instant grace and elegance to the windows and are suitable for a full range of window treatments from the simple to the dramatic.
Padded pelmets are ideal to add style to any room. They can matched with the rest of the window treatment. If fringing, braids, tassels or binding are added to the bottom edge, it will create a focal point of the window dressing. This enhances the shape as well.
Difficulty Level
Easy to Moderate
Time Required
About 2 hours, depending on the selected design
Resources Required
- Duct Tape
- Fabri-Tac Glue
- Thin quilt batting
- Straight edge/ruler
- Foam Core
- 5-Minute Epoxy by Devcon
- Fabric
- Two lightweight L-brackets
- Ribbon
- Scissors
- Iron
- X-acto knife
- Shears
- Two small C-clamps
Instructions
- Measure the size of the window, and eyeball about how wide, high, and deep you would like the pelmet to be. This will help you to determine the size of the pelmet.
- Cut the foam core to size. With the help of the duct tape, hold the pelmet pieces together.
In order to cover the exterior of the pelmet and also an additional 2 inches extra on all the sides, cut quilt batting just enough to do so. Wrap it around the front of the pelmet. Keep it in place with the tape on the back.
Then cut a piece of the fabric or cloth which is of a size just enough to cover the pelmet, along with an additional 3 inches extra on all the sides, and wrap it around the front. - Find out the place where you want the ribbon to be. In order to make mitered corners, fold and tuck the ribbon so as to create a right angle. Then press into shape with a hot iron. Use a dot of Fabri-Tac to glue the ribbon to the pelmet. Let it dry.
- Screw two L-brackets to the top interior on each side of the pelmet following the the Epoxy. While doing this, ensure that the unattached bracket ends are facing inward and are parallel to the top front of the pelmet. Secure into place while the glue dries. Then add the duct tape to clamp the brackets.
- Finally, mount the pelmet to the wall just above the window.
Tips & Warnings
- You can use L brackets, screws and wall anchors to hang the pelmets. If the pelmet feels too heavy, get help. Pelmets are superb air flow controllers around the windows. They are energy efficient. In the earlier days, they were highly embroidered and ornamented with heavy trims befitting the style of the day. These days, lean looks are in fashion. A pelmet can be decorated using a bamboo, wallpaper or even simple paint.
- If you wish to make a straight pelmet, a full sized paper pattern should be made before the fabric is cut. The size and shape of the pattern is easy to adjust until the required effect is achieved.
- Stiff pelmets are beneficial in case you wish to cut the lower edge of the pelmet into any shape. Stiff pelmets are economical on the fabric.
- Since the pelmets are heavy, it is important to take utmost care to mount them into a stud. Alternatively, you can use wall anchors.
- Pelmets could get dirty easily. You can use a vacuum cleaner to remove the dust. Care needs to be taken, as once soiled you may have to replace the fabric, as it is difficult to clean.
FAQs
1. What are the alternatives to a padded pelmet?
Padded pelmets are only one of the few ways of making a pelmet. A pelmet can be made of plywood, and may be painted, or fabric covered.
2. How much does a pelmet cost if it is made as per the instructions provided?
Such a pelmet would cost only about $40, whereas if you go to buy a pelmet, the cost is outrageous.