
Innovation and creativity has no limits. The project that we are going to introduce proves this. Now you can make your own Nixie Lantern clock. We are going to introduce you to the various things that you should know about building the lantern clock yourself.
This post will tell you about the difficulty level involved in making your own lantern clock, what are the resources required to complete the task, how much time will it take to build the clock, what is the estimate cost which you may incur, a step-by-step instructions to guide you through the process, answers of some frequently asked questions, some quick tips and things to watch out for so that you keep yourself safe while making your lantern clock.
Difficulty level
The difficulty level of making your own steampunk lantern clock is moderate, which means you will require basic technical knowledge to complete the project.
Time required
The time required to complete the project totally depends upon the skill of the person. A highly skilled person can complete the project much earlier when compared to a beginner.
Resources required
The following resources are required to make the lantern clock yourself:
1. Large walnut slab having dimensions 2″ x 36″ x 12″
2. Large maple slab having dimensions 1.5″ x 30″ x 12″
3. Acrylic tubing of 2″ diameter
4. 125″ wall which is about 12″ long
5. Some gears and gauge faces, knobs and metal bits
6. A Nixie kit
7. Some basic knowledge and skills about electronics
8. A multimeter
9. Three blue LEDs
10. Brass and aluminum
11. 12 conductor 28AWG ribbon cable
12. 9VAC transformer
13. Some gear shafts and collars
Estimate cost
The estimate cost of the project depends upon the availability of the material listed in the ‘resources required’ section.
Instructions
Step 1: Finding the way
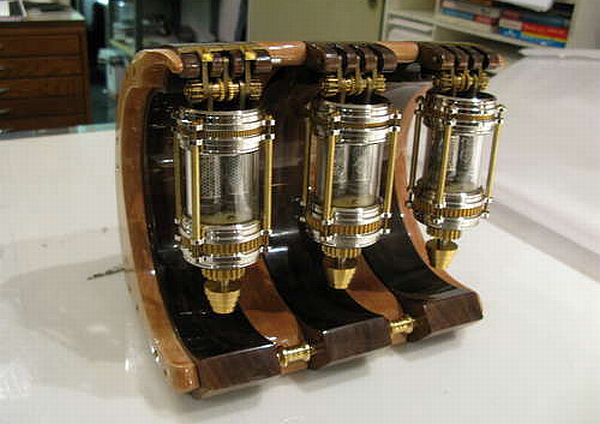
The first step of making your own lantern clock is to gather all the material which is listed in the ‘resources required’ section. You can use your own imagination and use the resources as per the requirements. In the image given, each Nixie is used in its own chamber.
Step 2: Direction found
After collecting and gathering all the resources and components required to make your own steampunk lantern clock, this step will help in preventing any wastage of time as all the resources will already be available with you. It will also save your money on fuel as you do not have to go to market to buy the stuff you will require.
Step 3: The wood
Using the walnut and maple slabs of wood you can recreate your own design. In the image, both these woods are sandwiched in contrasting colors to give them a graceful elegant classy look. You can shape the inside and outside curves of the wood using a disc sander and a spindle sander. After cutting the curves you can drill the holes into all the wood slabs and then insert all thread rods into them to bind them together and mechanically tight them so that they are physically locked.
Step 4: Electronics, buttons and stuff
Now is the time to use the knowledge of electronics. You can light the edge of each acrylic tube by using a 3 mm LED. If you paint the edges of the tube white, it will allow for a uniform bounce for the light which will increase the gracefulness of the clock.
Step 5: Closing the clock up
Now you can use all the components to put the lantern clock together. After the components are together, check the continuity using a multimeter from the tube circuit board. The blue LEDs used for illuminating the tube will be powered by three pairs of wires. As the clock’s board has a power range between 9 VAC and 15 VAC so you can choose a 9 VAC transformer to give 3 VAC per LED.
Step 6: The finish
There are many features you can enjoy in your lantern clock such as a fading digit effect in which the digits fade to the next number instead of just switching. There is also a slot machine function in which all the digits get cycled every minute and hour to update the clock.
Frequently asked questions
1. Can I use only one wood type for the wooden case rather than two?
Ans: It depends upon your choice and imagination. If you think it will look cool, go for it. There is no limitations to creativity.
2. Can I use different LED colors to light different tubes?
Ans: Yes, you can. But, be sure that the lights match each other as well as the wooden case you are going to use.
3. The brown color of the clock will not match my decor, what can I use for black and white interiors?
Ans: You can paint the wood black and white and can also choose the LED light’s colors accordingly so that the steampunk lantern clock matches the black and white interiors of your place.
Quick tips
1. In order to make the clock hassle free, you need to have knowledge about electronics or have someone with you who does.
2. You can paint the edges of tube white so that the LED’s light gets bounced uniformly and the lantern clock looks graceful.
Things to watch out for
1. Be extra cautious while using electricity. The electronic things are dangerous. Make sure you know the dangers associated with every component you use to avoid injury.
2. Cutting the wood slap’s curves is a critical thing. Be careful while doing it, wear all the safety equipments required while cutting the curves.